Saturday, August 24, 2019

Armada - 8/24 Battle Report

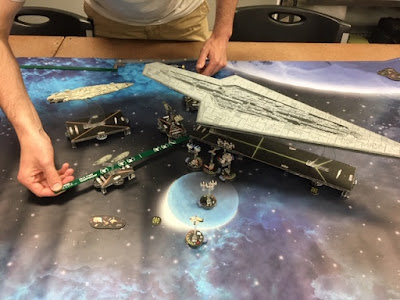
After a hectic first week of school, I was pleasantly surprised from a text from Michael with a picture of his brand new SSD, asking if I was free this weekend. And so today I took a little time off to drive to Springfield and play some Armada.

I brought a fleet I named "Dumpster Fire Defiance."

Name: Dumpster Fire Defiance
Faction: Rebel

Commander: Garm Bel Iblis
Assault: Advanced Gunnery
Defense: Fire Lanes
Navigation: Intel Sweep

MC80 Command Cruiser (106)
• Garm Bel Iblis (25)
• Strategic Adviser (4)
• Auxiliary Shields Team (3)
• Electronic Countermeasures (7)
• Leading Shots (4)
• Defiance (5)
= 154 Points

Nebulon-B Escort Frigate (57)
• Auxiliary Shields Team (3)
• Linked Turbolaser Towers (7)
• Yavaris (5)
= 72 Points

Nebulon-B Support Refit (51)
• Auxiliary Shields Team (3)
• Linked Turbolaser Towers (7)
= 61 Points

GR-75 Medium Transports (18)
• Ahsoka Tano (2)
= 20 Points

Squadrons:
• Biggs Darklighter (19)
• Jan Ors (19)
• 2 x X-wing Squadron (26)
• Gold Squadron (12)
• VCX-100 Freighter (15)
= 91 Points


Total Points: 398

I wanted to continue experimenting with Nebulon-B's sporting ASTs/LTTs, and this fleet is derived from the fleet I ran against Hubert a few weeks ago. However, in light of my game with Hubert, I decided to swap things up a little bit to give me better tools to deal with an SSD. First up, and partially because Hubert recently gave me Home One for my birthday, I swapped out the Liberty for a MC80. I've never been particularly drawn to the ship, but after playing it, I have to say: Defiance might be the best non-Demolisher/Yavarris title in the game and I can't believe I've slept on it for so long. Anyway, I elected to try out the MC80 in part based on the recent article from CGYSO noting ECM as an effective counter to SSDs, and to render me less completely countered by HTTs than I was versus Hubert.  

The "Dumpster Fire" part of the name comes from the squad ball, which is Schmitty's from GenCon. It has the Tar Pit, combined with the incredibly effective for its point cost Gold Squadron and a VCX as a quality of life buff/way to play strategic objectives. 

I spent a long time going back and forth on this fleet, trying unsuccessfully to cram in the MC80 Assault Cruiser and Yavarris to no avail. So I settled on the Command Cruiser and called it a day. 

Here is what Michael chose to run: 


Command SSD with a Gozanti and a flak Raider/Vader/Boba for anti-squadron cover. Notably the Executor has Intel Officer and Palpatine on it for a defence token discarding synergy. The admiral was JJ. 

Michael had bid, chose to go first, and picked my fire lanes. This would be my first time playing an objective of this style, so it would be interesting to say the least. 


This setup should look familiar to anyone who saw my game versus Hubert. @Daniel, he might have deployed the SSD in the corner but both were effectively blocked off with debris. When he deployed in the center, I did my typical "deploy on either side" schtick.

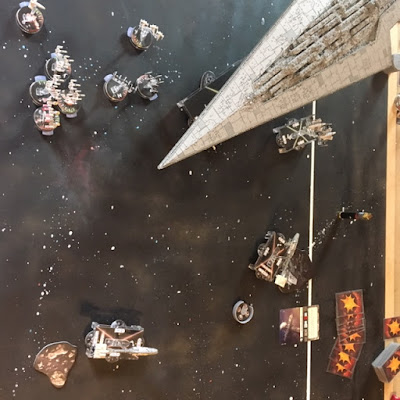
Anyway, we got started and Garm did his thing, with me triggering AST everywhere in the interim. The most notable thing about the opening was Michael's decision to start his raider off at speed four, a huge mistake as it would turn out. Towards the top of Round 2, it ended up in the middle of my squadron ball.


Cool placement bro. 

It suffered the fate of all Raiders and died with most of its shields still up, eaten alive by squadrons. 

However, I underestimated the ability of JJ to make your SSD turn on a dime. 


Yikes. 

So Michael had my Nebs in a pretty good place. JJ strikes me as much better than I initially thought he might be for the SSD, as he saves you from ever really having to Navigate while not giving up the ability to keep your opponents in your front arc. The SSD has so many shields and typically an unengaged side, so having to sacrifice a shield or two is not really a big deal. 

However, Nebs are tough little ships and Yavarris took a massive front arc shot of 9 hits like a champ. evading 2 and bracing the remaining 7 down to 4. 

My other Neb accelerated to speed 3 to try and dodge past the front arc as the Pickle came in from the left. 

My VCX ensured I was winning fire lanes during these turns, typically scoring two per turn to his one. Fire lanes was definitely the most favorable objective of my suite for him, as the SSD gets a leg up on getting the tokens due to how far in the middle of the board it starts, but my strategic was allowing me to steadily start accumulating more. 


By the top of round 3, Vader was gone and Boba was on his way out. My Nebs had managed to slip into the side arcs of the Executor. Michael concentrated fire and tried to obliterate the Yavarris, but came up one damage short. 

For anyone who hasn't played Nebs with ASTs, it completely changes how you play the ship, not only making the already stalwart little ships tankier but additionally allowing you to consistently double-arc and increase your damage output. 

Yavarris was able to get a last activation in before ramming into the SSD and killing itself like the hero it was. Yavarris continues to simply be one of the best titles in the game, and I can't express how much easier strategic made it to use. I actually don't think I will run Yavarris without strategic again. 


The other Neb slipped behind the SSD and we traded flotillas. 

I honestly probably should have just forgotten trying to kill the SSD and focused on objectives, I could have gotten at least another couple tokens, but I really wanted to get this thing to half health to prove that I could. 

Palpatine and Intel Officer were strong in conjunction, but the lack of activations (especially with the Raider gone early) meant that usually by the time I started attacking the SSD, he had gone so there was no real consequence to spending the tokens. 

With Boba gone, the squadrons continued working over the SSD (with Gold Squadron doing some stellar work). The flak was strong but not as overpowering as that on the Assault Prototype, so I managed to do this while only losing Jan. 


However, without squadron commands queued up on the MC80 and the SSD speeding towards the the edge of the board at speed 2, I was unable to get it to half health. It ended the game with 14 health, 3 health short of my goal. 

The token game ended up closer than it should have been, with me at 8 and him at 6, but combined with nailing the Raider and his very expensive squadrons to my loss of only Yavarris, it turned out to be a 7-4 Rebel Victory at 243 to 201. 

Michael's flying of the SSD was pretty solid, notably using JJ to good effect. The losing move was the pointless sacrifice of the Raider. I also think the squad composition was relatively poor, and Boba in particular did not live up to potential. 

Defiance shone when I could use it (leading shots from long-range!!!), but his commitment to going left, put me in the position of tailing him for most of the game and unable to land good hits on target. I would have killed for Engine Techs a couple times, and they could have definitely gotten me in range to hit him another time or two for the damage I needed to score a complete victory. 

If I had this particular game to play over again, I would have placed the MC80 much more in the face of the SSD and counted on ECM to keep me alive. 

Neb-Bs with AST continue to pleasantly surprise me with their staying power in the face of an SSD. My LTTs were a lot more fickle this time around though and it makes me think that I really want IF and to run extremely economic Support Refit Neb Bs with only ASTs for a cheap 54 points each. 

I definitely think I want to continue experimenting with strategic, as I know people don't like playing against it and with the right bid I could potentially force my opponent to play some extremely unfavorable objectives where they have to charge into me or simply lose. 

A fleet I came up with in the aftermath of today: 

Name: Nebulon MSU
Faction: Rebel

Commander: Garm Bel Iblis
Assault: Most Wanted
Defense: Fire Lanes
Navigation: Sensor Net

Pelta Assault Ship (56)
• Garm Bel Iblis (25)
• Auxiliary Shields Team (3)
• Intensify Firepower! (6)
• External Racks (3)
= 93 Points

Nebulon-B Escort Frigate (57)
• Auxiliary Shields Team (3)
• Yavaris (5)
= 65 Points

Nebulon-B Support Refit (51)
• Auxiliary Shields Team (3)
• Quad Battery Turrets (5)
= 59 Points

Nebulon-B Support Refit (51)
• Auxiliary Shields Team (3)
• Quad Battery Turrets (5)
= 59 Points

GR-75 Medium Transports (18)
• Ahsoka Tano (2)
= 20 Points

Squadrons:
• Jan Ors (19)
• Biggs Darklighter (19)
• 2 x X-wing Squadron (26)
• 2 x VCX-100 Freighter (30)
= 94 Points

Total Points: 390

We'll see if I ever get to run it!

Tuesday, August 13, 2019

Armada Weekend - Sector Wars

Finally, the big event. On Saturday, we started setting up around 9:30 for the 6 1/2 hour extravaganza of sector wars. Four 600-point fleets going head-to-head:


I'm not going to reproduce the lists, because the wall of text won't be very interesting to readers. Instead, I'm going to summarize each of the fleets: 

Rebels - Dave

I ran an iteration of the "Dunk" fleet I developed for our first Coreillian Conflict, edited to be better for the 2v2 and against an SSD. The "Dunk" fleet concept was to use a Large Squadron Ball of bombers plus a battle carrier Armored Cruiser to eliminate an ISD before it could hope to retaliate *que airhorns in the distance.* To that end, my fleet had an MC-75, a slew of B-Wings, escorts and Nym, accompanied by Yavarris, a Pelta sporting IF, and a couple TRCR90s. 

Rebels - Daniel

Daniel flew Ackbar with Pickle, 2 Goldfish, a TRCR90, Admonition, and a medium squadron ball. Ackbar is an exceptional Sector Wars admiral as his dice modification works against either opponent instead of just one. Daniel's objective was to be a massive gun line to counter a variety of enemy threats, with the squads serving as escort for my bombers.

Empire - Hubert

Hubert went all in and ran Executor-II, kitted out to the tune of 500 points with a wide array of offensive and defensive upgrades. Supporting it he took a medium squadron ball of interceptors and aces designed to protect the Executor-II from squadron attack. 

Empire - Fish

Motti's flying Bricks, but this time with actual upgrades on them courtesy of the 600-point cap. Backing them up he took a handful of TIEs and an Interdictor. I want to shout out Daniel for correctly predicting they would run this fleet. The idea here is that you just have so many thicc bois on the table that your opponent can't get through them all. The combined Imperial fleet sported a whopping 89 hull points. 

Daniel and I elected to go first and took Contested Outpost. 


The general plan was to get me facing Hubert and Daniel facing Fish, although after seeing the SSD tear through squads the previous day, Daniel and I were both feeling quite apprehensive about my B-wings's odds. 


Hubert deployed the SSD in the corner, and I countered with my signature "Large at Speed 3" to counter him. Fish deployed protecting the SSD's right flank. Daniel deployed approximately across but with my CR90s and his Admonition on the far left. All the squads for both sides were grouped towards the SSD. 

The battle began in earnest on turn 2. 


The MC-75 led it off commanding squadrons into the SSD and using Adar Tallon to set up Nym for the triple tap. Unfortunately, Hubert used a DCO'd contain to stop Nym's crit effect, then very effectively focus-fired him down with squads to finish him off before Yavarris could go. 

The squad battle broke into a general melee, with Daniel and Fish's squads piling on. I ended up commanding the Rebel squads for the majority of the game. The odds were clearly against the Empire squads with about 240 points in squads to their 120, but they had the triple dice flak of the SSD. 


At the bottom of turn 2, we were able to wait out activations and take gunnery team shots out of the front of all of Daniel's ships to begin dropping the shields on the ISDs. 

The Empire was notably very out-activated this game, to the tune of  14 to 21. As a result, on the left side of our formation we were always able to activate after everything had drifted into closer range. Yavarris and the MC-75 always took first activation on our side, trying to get in hits before they or their squadrons could be wiped by the SSD. On the top of turn 3, the MC-75 made one of the critical moves of the game, activating Cham Syndulla and changing Hubert's engineering commands to navigates and squadron commands. The SSD was seriously crippled by this action. 


Critically, MC-75 lived through turn 3 with a mere two health, as it was safely in a single arc of the SSD. However, Hubert finished off Jan Ors, which meant we had to take a turn trying to mop up his annoying array of Imperial Squads including the always infuriating Cienna Ray.

On the left side, we were able to wait out Fish once more, and Daniel's Ackbar gunnery teams AFs began to score huge hits. 


The ships were literally millimeters apart exchanging broadsides and front arcs, with the AF's getting the better of the exchange. Our flanking force started firing on the rightmost ISD of Fish's, bringing it to the brink of death. IF came up big in these volleys, and I think we added something to the tune of ~15 damage with it over the course of the game. 


We actually had to demount the MC-75 so the base could slide in next to the SSD on turn 3. 

With most of the Imperial Squads cleared out, the MC-75 led off turn 4 with a massive hit on the SSD and commanding squadrons in close for Yavarris. However, Hubert countered with the triple attack he'd been waiting all game for, and eliminated the Pelta, MC-75, and a TRCR90 in one massive activation. 

On the left side, both the Assault frigates were in the process of going down, but Daniel got the better of the exchange and traded them for all three ISDs by the bottom of turn 5. The center of the map had cleared up quite a bit by this point, the MC80 and our flanking force on the left, the Interdictor and SSD in the middle, and Yavarris and an array of flotillas crawling up the right side out of range of the SSD. 


The only remaining question at this point was whether or not the SSD would go down. The ship took massive damage from squadrons on turns 4 and 5, including 6 Yavarris double-taps. However, it gave as good as it got, and eliminated squadron after squadron flakking from all arcs. 

By round 6, the ship had less than a dozen health left and few shields to spread around. Yavarris gave it one last double-tap that got it down to a handful of health, but Hubert retaliated and eliminated all but two of the remaining squadrons. After a TRCR90 attack, it was down to 2 health, and either the remaining squadrons or Admonition would have to finish the job. 


One amazing roll later, we had ourselves a dead SSD. 


Excellently played game! GG Hubert and Fish. We got lucky more than our fair share, but the ultimate issue was the lack of escorts near the SSD. It gave as good as it got, but without supporting ships to clear out Yavarris, the MC-75, and the bomber ball, it was only a matter of time. Meanwhile, Ackbar AF's proved themselves to still be quite tough, strong enough to go toe to toe with the ISD's and come out on top. 

Looking forward to the next time we can play something quite this epic!

Sunday, August 11, 2019

Armada Weekend - Me vs. Hubert

So, without any further ado, let's get into the actual battle Hubert and I fought on Friday!

I went first and chose Station assault, and he placed them at either corner of the battlefield. He shoved his obstacles in the corners, while I shoved my two in the middle. I deployed along a wide front, with the idea of forcing him to choose a direction to turn his SSD after he placed it in the middle.


This ended up being a relatively boring game, as my plan was to essentially avoid the SSD and take out the stations instead. Meanwhile, with just the SSD, Gozanti, and Gozanti, Hubert didn't have a whole lot of capability to chase me down if I chose to avoid him. 

Turn 1 was nothing but maneuvering, and the action didn't kick off until turn 2.


I forgot that the Assault Prototype had red flak, and essentially my whole squadron ball is in red flak range. Basically all of them ended up taking a hit. for his part, Hubert ran over an asteroid and pulled possibly the worst crit he could have found: 


Fortunately for him I had little in front of his ship so it ended up mattering little.

The squadron battle went very poorly for Hubert, and he ran over Howlrunner sending her to the back of the SSD. My fighters had cleaned up his 5 TIEs by the bottom of round 3 and started attacking the SSD itself. But all this time he was flakking my squadrons.


On the right side, the LTT Nebs were doing an admirable job taking down the outpost while staying out of range of the SSD. The same could not be said for my signature speed 3 Liberty on the other flank, which was not doing nearly the same level of damage to its outpost and had to decelerate to get enough shots in before heading for the rear of the SSD.


I basically realized at this point that attacking the SSD further was pointless, and I might as well keep my low health squadrons alive. However, it was already too late for many of them to escape, as they could not get out of red range in a turn. Hubert picked off Biggs and Dutch with red dice hits as they fled, while Howlrunner re-entered the fray and nailed Jan right as she was about to escape.


My biggest mistake, however, came on turn 4. If you look above, you can see a Neb to the left of the SSD. It's currently in a single arc at red range. I should have gone with basically anything else first and not risked ending somewhere I didn't want to be, but instead I chose to go with it and wandered into a medium-range double-arc.


RIP. 

With all my squadrons and the Nebs gone to both stations and the TIEs for Hubert, Hubert was set to win a 6-5 with 132-120. Here's how things stood as it ended: 


A close game that showed off many of the strengths and weaknesses of the SSD.

Hubert and I could not decide if Station Assault was a good objective or not for his fleet. To Hubert's credit, it did distract my Liberty, keeping it out of the fight for most of the game and drawing the attention of my guns elsewhere. On the other hand, its easy to imagine a re-run of this game where I was smarter moving my Neb and didn't commit my squadrons to flak range, scoring a 100-40ish victory off the two stations for 7-4 tournament points. Hard to say for sure.

For my part, I was pretty happy with how my fleet played, and very happy with Garm plus ASTs. The LTT Nebs also punched far over their weight in what I hope will not be a fluke performance. However, I am concerned that this list doesn't have enough tools to deal with SSDs, which may be all that matters right now.

HTT was not as debilitating as I though, as I didn't realize that it's effect only took hold if you attempted to use more than one defense token. With this in mind, it's effects were not as bad as I thought they might be.

At any rate, I had been looking forward to this game for months. Congratulations to Hubert for the win in his inaugural game with the SSD!

SSD - Initial Impressions

It was an epic weekend of Armada in Little Rock, and the battle reports for both games will be coming soon! In the meantime, however, I wanted to take a moment to reflect on the SSD, how to play it, play against it, and where it sits in the Armada meta. This weekend I played against the Assault Prototype variant and the Executor II Variant, and have some general thoughts based on those experiences.

Auto-Includes On An SSD

If you want to fly an SSD, There are some upgrade cards that might as well be stapled to it, as nine times out of ten, you will want them. First up:

 - Leading Shots (Obvious, maybe you can skip if you have Ravager/Krennic/IF)
 - Quad Battery Turrets (Everything is going faster than you, and this works in every arc)
 - Gunnery Teams

This might as well be stapled on as well:

 - Comms Net Gozanti (at least one)

The officer slots have less flexibility than I initially thought, as there are some pretty clear best choices for them. Obviously there is room at the margins, but you should think long and hard if you don't include the following:

 - Damage Control Officer (5)
 - Defense Liason (3)

Honorable Mentions:

 - Captain Brunson (5)
 - Commander Vanto (7)
 - Captain Needa (2)
 - The Senate (3)

So, why these? It ties to why you would bring an SSD in the first place.

Why Bring An SSD?

This will make more sense in a moment, but I after some reflection I think the SSD is a passive ship. You don't really generate a win condition so much as you lay down a challenge to your opponent and stand ready to capitalize on their mistakes.

What do I mean by this. Well, you essentially tie up 250-330 points of your fleet build in a single ship, presenting your opponent with three options:

1. Try to ignore the SSD, score points off of objectives and your other fleet elements, and win that way (this only allows for something akin to a 7-4 MOV at best).
2. Try to get you to half health and score win a bigger victory off that.
3. Try to table you and completely commit to your destruction.

Because the check doesn't come until the end of round 6, option 2 is not very viable. SSD's are stealthily even tankier than they initially appear, because best practice seems to be running engineering commands for the last three turns in a row, recovering 6 health. So you need to do effectively 17+ damage to the hull, not just 11, to even score half points off it. At that point, you might as well be gunning all in to kill it consider it a consolation prize if you end with it at half health.

As the SSD player, you force your opponent into this either-or decision, and in a tournament format where you want to have any hope to advance, the latter is the only real option. However, the SSD also punishes mistakes in positioning, mistakes that are more likely to occur if you opponent seeks to destroy you. What do I mean by this? Well, unlike most Armada ships, where half of the battle is trying to delicately maneuver them to double-arc opponents and overpower them with firepower, the SSD can essentially never maneuver to make this happen. You are at the mercy of your opponent's moves. If they double-arc themselves, congratulations, you just got a free kill. If they never do, your job grows exponentially harder.

With this all this in mind, defensive builds on the SSD designed to deny your opponent points and lengthen the time it takes them to do decisive damage to the SSDseems to be the way to go. This gets us to the four counters to SSDs, and how your default officers help deal with them.

SSD Counters

1. Crit Effects

Crits are proportionally devastating to the SSD in line with its massive point cost. In particular, you would like to really avoid HIE crits and APT crits, as these undermine you immensely. DCO is your ultimate insurance policy. You may not need it every game, but you will be glad when you have it.

2. Command Dial Screwage

This is not an original observation, but command four and the resultant risks of having the wrong commands queued up make the generic officers that offer dial control much more appealing on the SSD. Additionally, you really need to worry about Slicer Tools, Cham Syndulla, and the like. If you are depending on spending the back half of the game recovering health, you don't want anything to interfere with that. Take Defense Liason as a cheap insurance policy against this.

3. Squadrons*

SSD flak is no joke. I saw both variants take down nearly a dozen squadrons between them over the weekend. But, Hubert's Executor-II also perished largely to B-wings piling in its arcs and overloading it two damage at a time

So where does this leave us? Well, it's a mixed bag, thus the asterisk. So obviously like most big ships the SSD is vulnerable to lots of small attacks that overheat defense tokens, best delivered by squadrons. However, the heavy flak combined with the red flak on two of the variants means that if you have a squadron that is three speed or slower, you probably will need to spend one turn in the flak before even making contact with the target. The damage adds up quick and squadrons on their own will quickly wilt beneath the firepower, especially with so many anti-squadron upgrades available to the SSD.

Rebel squads are actually worse hit by the SSD as Y-wings and B-Wings are speeds 3 and 2 respectively, and struggle to get in attacks before being flak'd to oblivion. I have to say the SSD and the existence of Transponder Net might be a stealth buff to TIE bombers and Lancers, as their Speed 4 is suddenly more at a premium in a world where red-flak is becoming more commonplace and you have to dodge around enemy heavy squadrons.

A final note is that as an SSD player, you can quite legitimately go with no squadrons and theoretically be okay, especially if you have upgrades like Kallus, QLTs, Annihilator and the like. However, if enough bombers get into range and importantly, spread out over your arcs, you will star t taking hits. Squadrons are just asterisk'd as counters to the SSD because squadrons alone quail, and can only succeed in conjunction with other elements to distract the SSD.

4. Side Arcs

This is where it all comes together. The side and auxiliary side arcs on the SSD are enormous, and even large ships can comfortably sit in them. Importantly, it is not difficult to sit in one where you are double-arcing the SSD and it is not double-arcing you. The front, and the areas at the border of it's firing arcs are death for basically anything, but lots of ships can comfortably sit inside one of the SSD's side arcs, especially at red range, and pitch tons of dice from double-arcing while the SSD can only respond impotently. The size of the model means its really easy to focus fire the thing down, as most ships on your side should be able to get into range to kill it.

Building A SSD Fleet

Mitigate damage, that is the name of the game. Specifically mitigate damage from your counters and draw the game out. If your opponent is diving in to kill you, they will eventually mis-position a ship, or you will land a third or fourth round of flak that just wipes a half-dozen squadrons. Time is on your side, but give yourself more of it. DCO negates crit-effects, DL negates command dial screwage. The rest of your build should focus on rectifying your other two vulnerabilities. Squadrons can effectively be countered by loading out the SSD. As for the side-arcs, this weekend settled for me what the best escorts for the SSD are, and they are raiders and gladiators. These ships are here as true escorts to clear enemy ships out of your SSD's side arcs when you can't effectively kill them with the SSD.

Here is an example build using Demolisher as a sweeper:
Name: Example Thrawn Fleet
Faction: Imperial
Commander: Grand Admiral Thrawn
Assault: Blockade Run
Defense: Contested Outpost
Navigation: Solar Corona

SSD Command Prototype (220)
• Grand Admiral Thrawn (32)
• Damage Control Officer (5)
• Emperor Palpatine (3)
• Commander Vanto (7)
• Intensify Firepower! (6)
• Take Evasive Action! (6)
• Gunnery Team (7)
• Quad Laser Turrets (5)
• Leading Shots (4)
• Quad Battery Turrets (5)
• Executor (2)
= 302 Points

Gladiator I (56)
• Ordnance Experts (4)
• External Racks (3)
• Demolisher (10)
= 73 Points

Gozanti Cruisers (23)
• Comms Net (2)
= 25 Points

Total Points: 400

Notice I have elected to use Thrawn as an Admiral as my counter to command dial screwage.

This is also the part where I point out that "Take Evasive Action" is essentially a Nav Teams for a ship that doesn't have a support teams slot, and your standard navigate action plus token will now allow you to have a yaw value of two at speed 1 without JJ. Food for thought.

This fleet can be easily redone to have two torp raiders, or you can swap to Piett and get one torp raider and one light artillery raider. Of course you are vulnerable to all-in bomber fleets, so you should bear that in mind with a fleet like this. As a rule, you should always take one of the SSD titles, as they are all really solid (except for Eclipse), and inform the "type" of SSD you are running.

In terms of taking the SSD to tournaments, if you are confident that more opposing lists will be hedging themselves, have unclear win conditions, or played by less skilled players, the SSD is a really strong way to capitalize on an opponent's mistakes. The ship presents a massive challenge to your opponents that they will have to rise to or lose.

Concluding Thoughts

If you are playing Armada in the near future, you need to be prepared to fight an SSD. To that end, make sure you list includes at least one of: bombers, command dial screwage, and crit effects, alongside ships that can comfortably sit in an SSD's side or side auxiliary arcs. More importantly, when you go into a game with an SSD, decide immediately if you will seek to destroy it or run away from it. There can be no middle ground.

If you fly an SSD, you can not completely overcome the more passive style of play it encourages, but your list should lean into the strength's of the SSD, short up its weaknesses, and create opportunities to take advantages of an opponent's mistakes.

Wednesday, August 7, 2019

Armada Weekend - Prelude

So, this weekend as a bit of a last hurrah before the start of the school year, I will be going down to Little Rock to play a couple games of Armada and hang out with friends!

My main opponent for the weekend will be Hubert, who finally got his SSD in yesterday (and god does it look beautiful). He and I will be matching up in a 400 point game on Friday. Followed by him and Fish playing Empire against Daniel and I playing Rebels in a 1200 point sector wars game we have planned for Saturday.

Hubert and I just exchanged fleets for our Friday game, so this gives me a moment to talk about what each one does and our matchup.

My Fleet:


AST-LTT-Iblis Fleet 2.0, “Liberty Fleet”

Faction: Rebel
Commander: Garm Bel Iblis
Assault: Most Wanted
Defense: Contested Outpost
Navigation: Solar Corona

MC80 Battle Cruiser (103)
 - Garm Bel Iblis (25)
 - Strategic Adviser (4)
 - Gunnery Team (7)
 - Auxiliary Shield Techs (3)
 -  Leading Shots (4)
 -  XI7 Turbolasers (6)
 -  Liberty (3)
= 155 Points

Nebulon-B Support Refit (51)
 - Auxiliary Shield Techs (3)
 -  Linked Turbolaser Turrets (7)
= 61 Points

Nebulon-B Support Refit (51)
 -  Auxiliary Shield Techs (3)
 -  Linked Turbolaser Turrets (7)
= 61 Points

GR-75 Medium Transports (18)
 -  Ahsoka Tano (2)
 -  Expanded Hangar Bay (5)
= 25 Points

Squadrons:
 - Jan Ors (19)
 -  Dutch Vander (16)
 -  Biggs Darklighter (19)
 -  2 x X-wing Squadron (26)
 -  Z-95 Headhunter Squadron (7)
= 87 Points

Total Points: 389


This is an early draft of what I hope will be a tournament fleet I run at the Chicago Charity Tournament in November. I'm testing out Rebellion in the Rim cards, primarily Auxiliary Shield Techs and Linked Turbolaser Turrets, and seeing if they make non-Yavarris Nebulons good.

AST has a natural synergy with Garm (who I was reconsidering before Scmitty's win at Gen Con thank you very much), as Garm's problem has always been that the first round free tokens largely go to waste since you are usually not engaged that turn and can't store what you normally would (Phoenix Home being the sole exception). Now, I get the full suite of Garm tokens, and run engineering commands on the Nebs and Lib to bring the side shields up to 2 and 3 respectively.

The fighter ball is a standard mixed capacity group I've been playing with for quite some time now. The more astute among you will note that this list is not too far off from my Jacksonville or Springfield fleets. Final note: Liberty is not a great title and its not worth retrofitting a LMC80 into a carrier to make it work, but with Garm free tokens and a lack of points (or need) for a second flotilla, it seemed like a good way to command squadrons effectively.

Now, onto Hubert's fleet. The debut of the SSD!

OUR SHIPS CAN'T HANDLE FIREPOWER OF THAT MAGNITUDE

Faction: Empire
Commander: Admiral Piett
Assault: Station Assault
Defense: Contested Outpost
Navigation: Dangerous Territory

Star Dreadnought Assault Prototype (250)
 - Admiral Piett (22)
 - Director Krennic (8)
 - Wulff Yularen (7)
 - Damage Control Officer (5)
 - Heavy Turbolaser Turrets (6)
 - Quad Battery Turrets (5)
 - Leading Shots (4)
 - Ravager (4)

Gozanti-Class Cruisers (23)
 - Comms Net (2)

Squadrons:
Howlrunner (16)
Tie Fighers x 5 (40)

Now that is a thicc boy.

Hubert took an extremely expensive officer suite that allows him to hang on to a single concentrate fire token and do work with it every single turn. In the event he uses Piett on another token, Ravager allows him to still treat Yularen's token like a dial. More importantly, on turns he doesn't use Piett on it Krennic gives him amazing dice control at long range (not to mention rerolling at long range with leading shots + QBTs), and on turns where he does use the full dial effect, Krennic gives him total dice control at long range.

This ship always gets rerolls, if anything it has too much dice control which is not something you will hear me say often. If I were to redo this list I might take off either Ravager or Leading Shots, probably the former.

DCO will unfortunately not be useful against me, but was a solid include given the ship.

Heavy Turbolaser turrets are a big deal for me, with the SSD they finally have a ship they're really good on! At any rate, all of my combat ships have double braces, big oof. If I lose, this upgrade will be a major author of my defeat.

This is likely to be one of the more unfavorable matchups I can encounter with this fleet, so it will be a good test of its combat potential.

Now, I will not be linking Hubert to this page until after our match on Friday, so I will spend a moment pontificating on how to play this.

First up, I have clear activation advantage (5 to 3) and clear deployment advantage (7 to 5). I think it's pretty clear I want to take first player and use my deployment advantage to keep my ships out of the front arc. I ideally want to cram all three of my combat ships into spots where they can hit one of the SSD arcs from long/medium range.

With a well-timed squadron command, Hubert's TIEs will get the jump on my squadrons. Their whole purpose is to tie me down though, and I think I want to mop them up quickly (bypassing is probably not an option) and start hitting the Ravager with bombing runs.

If I take first player, I can first-last with ease, and being able to wait out the SSD should be a huge advantage. There will be an interesting tension in wanting to run my ships at higher speeds to get them out of the front arc and risking proc'ing QBTs in the process.

So, with all that being said, the big question is what objective to take.

Contested Outpost just slaps me with a 100 point deficit to overcome. But, that deficit will be immaterial if I table him by destroying the SSD. Then again, do I want to plan on getting it to that point, or just pray I can get it to half health? I'm unsure what is reasonable at this point having not played against one before. However, if I choose it, I get to remove the station as a concern. I think he's decently likely to sit on it and regen health every turn if I give him the chance.

Station Assault is interesting. I don't think he can set up to defend both. So I just get a net 0 points  (unless I somehow find a way to creep past the front arc to destroy the second one), while still removing the station effect? That sounds pretty good honestly.

Dangerous Territory is also interesting. He's not going to be able to pick up more than 1 or two tokens, but it does mean I give him a free pass on the damage he might otherwise just have to suffer in the course of maneuvering the SSD over obstacles. I could potentially grab a couple two on debris on the board, and just regen shields with Garm tokens, turning it all into a net wash.

So....right now leaning towards Station Assault and still considering Dangerous Territory. I'll definitely need to reread the cards before I get there though.

At any rate, should be a fun weekend! Can't wait to see the SSD on the table.


Dave's Top 4 Overrated Armada Upgrades

At some point later this week I'm going to get around to writing up the Armada I played in Little Rock over the weekend, including the s...